As the weather gets colder, your home must have plenty of heating oil in the oil tank. The best way to avoid running dangerously low on heating oil is to monitor the level in your tank regularly. You can do this by consulting your oil tank gauge and conducting manual inspections of your oil level with a gauge stick.
- Understanding Your Oil Gauge
- How to Manually Check Your Heating Oil Level
- At What Level Should I Have My Oil Tank Refilled?
- How to Tell If Your Oil Tank Gauge Is Broken
- The Problem With a Broken Oil Tank Gauge
- How to Fix a Broken Oil Tank Gauge
- Schedule Automatic Heating Oil Delivery With Smart Touch Energy
The average residential heating oil tank has a capacity of 275 gallons. Similar to the oil tank in your car, the oil tank gauge does not show you how many gallons remain inside. Instead, it measures what percentage of your heating oil tank is full or still available. But what happens if your oil tank gauge no longer works? How can you determine an accurate oil level? Thankfully, there is a simple way to check and record your oil levels manually.
Understanding Your Oil Gauge
The more familiar you are with your oil tank gauge, the easier it will be for you to notice a malfunction.
What Does the Gauge Do?
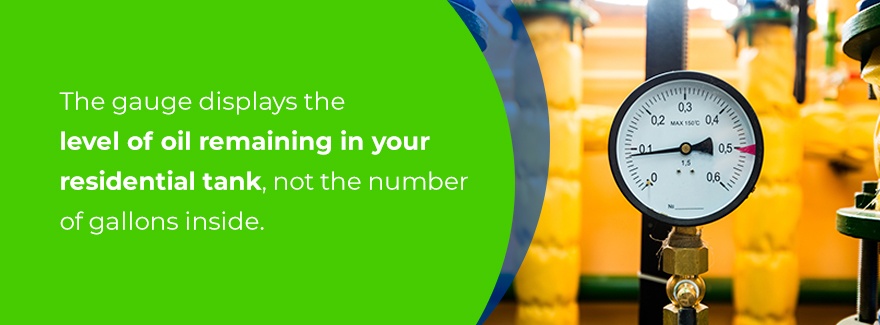
An oil tank gauge sits inside your oil tank. The device displays the level of oil remaining in your residential tank, not the number of gallons inside. To find the exact amount of oil in your tank, and the amount of available space left, you either have to have an electronic gauge or conduct a manual gauge reading.
Some gauges may use a different measuring method than others, but most will use quarter-inch or eighth-inch increments.
Do Oil Gauges Provide Accurate Readings?
Although your oil gauge provides a pretty close approximation of your tank's oil level, it is not always accurate. Several factors can interfere with your reading:
- The gauge could malfunction.
- The gauge could become hard to see through due to age or oil buildup, and therefore impossible to read accurately.
- The shape of the tank matters — for example, a rectangular tank measures more accurately than a rounded one.
- Air and extra tank space may account for a portion of the number on your gauge.
Although your oil tank gauge is not exact, it is a good starting point for monitoring your oil level and watching for potential leaks. Learn more about the different parts of your oil tank here.
How to Manually Check Your Heating Oil Level
Manual tank gauging is one method of leak detection for tanks 2,000 gallons or smaller. The level of oil in the tank should be visible through the clear gauge. However, the reading is not always accurate. The gauge can become stuck or broken, or it could be so discolored from years of oil wear that it is difficult to get a precise reading.
Get a Gauge Stick
The first step of manual tank gauging is to get a gauge stick. You may have also heard a gauge stick referred to as a "tank stick" or "dipstick." While many people use a wooden yardstick or metal rod, the best gauge sticks are varnished to get the most accurate reading possible. A varnished stick limits the spread of the oil on the stick and provides the measurement. Be sure the stick you choose is straight and not warped or bent.
If you choose to use an electronic tank level monitor instead, chose one that can measure to the nearest eighth of an inch.
Measure the Contents of the Tank
Follow these steps to manually measure the contents of your oil tank with a gauge stick:
- Turn the top fill valve cap counter-clockwise and remove the cap from the tank.
- Lower stick gently until it touches the bottom of the tank.
- Bring the stick back up and read depth of oil to the nearest eighth of an inch.
- Record the measurement in your manual tank gauging record.
- Wipe the measuring stick clean with a dry cloth.
- Lower the tank stick and measure a second time. Record these results.
- Secure top fill valve cap to prevent leaking.
- Repeat the manual tank gauging process each week.
Analyze and Compare the Data
Once you have measured the level in your oil tank, you need to understand what that information means. First, you must convert the number of inches on your gauge to gallons. Use a fuel oil tank chart to help you do this. Find your tank size and compare it with the inches you see on your measurement. Subtract the total number of gallons in the tank from the size capacity of your oil tank to see how much space remains.
If you are concerned that your tank is losing oil, follow these instructions to track the level:
- Average the two initial stick readings to the closest eighth of an inch. Convert the number of inches to gallons. Consult the above chart, or the chart on your oil tank. If there is no chart on your oil tank— or if the chart does not measure to one-eighth of an inch — you may need to do some math.
- Once a month, add up each of the four weekly changes. After you have the sum of the four weeks, divide by four to get the monthly average tank volume.
- Find the test standards for your tank. If the change in number is not larger than the monthly test standard, your oil tank is operating as it should. If the monthly average change is larger than the test standard, you should call a regulatory agency to report a suspected leak as soon as possible. Then, contact your oil tank servicer and schedule an emergency appointment.
At What Level Should I Have My Oil Tank Refilled?
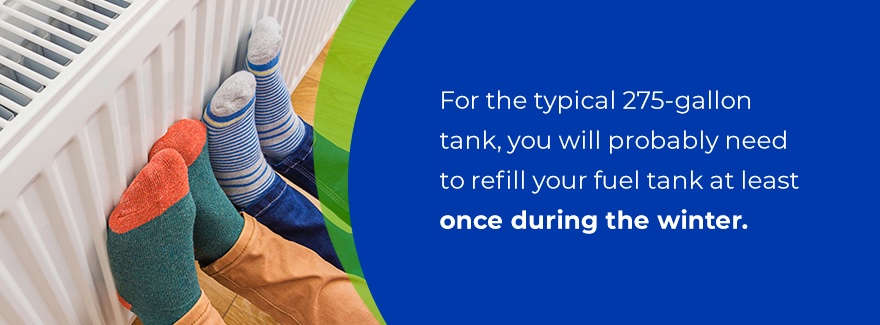
During peak winter months, expect to burn about three gallons of heating oil per day, or 100 gallons each month. Because oil gauges do not give an exact measurement, it is a good idea to avoid letting the gauge get below a quarter-inch. For the typical 275-gallon tank, this means you will probably need to refill your fuel tank at least once during the winter.
How much heating oil you will use depends on several factors, including the weather. Learn more about what to expect from your heating oil this winter.
How to Tell If Your Oil Tank Gauge Is Broken
An oil tank gauge can break for many reasons. If oil leaks, the buildup can cause your gauge to stop reading correctly. Older gauges may stop working due to natural rust or corrosion that occurs over time. If your gauge stops working correctly, you must repair or replace it.
One of the most effective ways to test your gauge is by taking an oil reading the same day you have it filled. Do keep in mind that, when you first refill a tank with oil, the gauge often indicates the tank is only three-quarters of the way full, rather than at full capacity.
You can also perform a manual inspection of your gauge. To do this, you need to first locate the oil gauge. It is usually on the top of the tank and is either clear glass or plastic. The gauge is often round and marked with numbers on the side, similar to a measuring cup. The gauge will also have a red floating marker — called a float — that indicates the amount of room still left in your fuel tank.
To test that the gauge is working correctly, manually remove the outer case by turning it counterclockwise. Be careful not to use too much force, or you risk damaging the protective cover. Once you have removed the cover, visually inspect it for any damages. If necessary, purchase and install a cover replacement.
Now, carefully press the floating marker downward. If it pops back up to the original position, everything is as it should be. If the float remains pushed down or becomes stuck, you need to have your gauge fixed or replaced.
The Problem With a Broken Oil Tank Gauge
A broken oil tank gauge is more than an inconvenience — it can be a hazard to your home, the environment and your wallet.
You Risk Running out of Heating Oil
If you are unable to keep an eye on your oil level, you risk running out of heating fuel. This scenario can be uncomfortable or even dangerous during frigid temperatures. An empty tank also runs the risk of condensation buildup. Condensation can cause bacterial growth, rust or other problems that could impact your tank and heating source.
The best way to make sure you never run out of heating fuel is by choosing a company that offers automatic heating fuel delivery.
You Could Overfill Your Tank
If you do not know how much oil is in your tank, you risk overfilling it. An overfilled tank leads to heating oil spillage, which is a hazard to your home and the environment.
- Your home: Heating oil has a low toxicity level for humans, but breathing the odor in for an extended period can make you sick or dizzy. That odor can seep into your belongings, including the floor, carpet and your clothes. Contact with skin can result in irritation. Because heating oil is flammable, you must turn off all flame sources until you can get a spill cleaned up.
- The environment: If your heating oil spills into the soil, it may then contaminate the groundwater. This situation is especially detrimental to homes that get water from an on-site well. If oil spills as a result of an overfilled tank, it is your responsibility to contact the proper channels to make sure you can have the spill cleaned effectively.
An overfilled or leaking fuel tank is also a costly error to make because you pay for fuel that ends up on the ground, rather than heating your home. To prevent overfilling, install an overfill alarm or an automatic shutoff device.
How to Fix a Broken Oil Tank Gauge
If you discover you have a broken oil tank gauge, don't worry — it is possible to replace an oil tank gauge as long as you are careful.
First, gather the necessary equipment. To replace a float gauge, you need: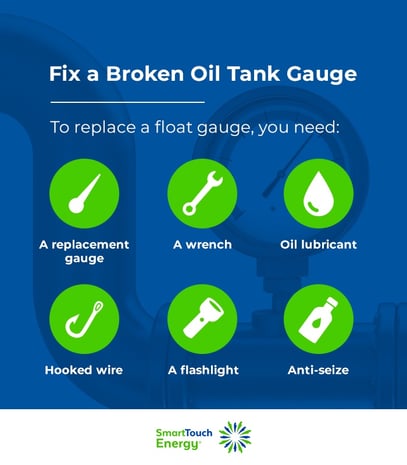
- A replacement gauge
- A wrench
- Oil lubricant
- Hooked wire
- A flashlight
- Anti-seize
Spray the tank cap with lubricant to loosen it. Turn the cap carefully with a wrench to avoid ruining the threads. Use a flashlight to find the end of the old float gauge arm and pull it from the tank with a piece of wire. Then, remove the gauge from the gauge pipe and place the new gauge inside. Re-insert the gauge and gauge pipe into the oil tank and close the lid. You might consider using anti-seize on the threads as you do this to ensure a tighter seal.
Once you install your new gauge, make sure you inspect it regularly, so it remains operational and easy to read.
Schedule Automatic Heating Oil Delivery With Smart Touch Energy
Inspect your oil tank gauge regularly and replace it as needed. In addition to your oil tank gauge, conduct regular manual inspections of your oil level. These manual inspections help you get the most accurate reading possible.
Never run out of heating fuel again when you schedule a heating oil delivery with Smart Touch Energy. With Smart Touch Energy, you have access to the following.
- Exclusive automatic delivery: Automatic delivery means you no longer have to worry about remembering to schedule an appointment for a tank refill. When you sign up for automatic delivery, we ask you basic questions and collect information so we can calculate the best time to deliver heating oil to your home. Automatic delivery customers also receive a discounted rate, saving $0.03 on every gallon of fuel.
- One-time delivery: If you want more control over when you order fuel and are not ready to commit to automatic delivery, a one-time delivery is a good option for you.
- Emergency delivery: Smart Touch Energy offers emergency delivery service when you run out of fuel. We can expedite your delivery in emergencies, typically getting your fuel to you in 24 hours or less.
- Prime and restart service: If you run out of fuel and then refill your tank, you might find your system needs a little extra help to get back up and running. Our trained experts know how to both prime and restart your heating tank so it can continue warming your home.
If you fall within our service area and are ready to schedule a delivery, all you have to do is create an account on our website and place your order. After you receive a confirmation email from a local dealer, you can expect delivery within the following three days.